Pages
▼
Oct 11, 2011
Butterfly Magnet
Here's a great craft for preschoolers. Stick a strip magnet to the back of a clothespin and wrap a piece of chenille stem around the top for antennae. Paint a coffee filter with watercolors and let dry. Then scrunch the paper in half and insert it into the clothespin for a cute toy that little ones can display on the fridge.
Recycled Watercolor Bunting
My daughter loves to paint. Oh, boy, does she love to paint. She's such a fan, I have to keep paints and a jar of water out at all times for her to paint throughout the day. Since I can't keep every single painting she has ever made, I have to come up with some other ideas for what to do with them. Here's an idea for a pretty bunting made from recycled watercolor paintings. I hung ours over my daughter's play area.
Oct 10, 2011
Spooky Hidden Ghost Painting
Oct 3, 2011
Hammered Autumn Leaf Bunting
For one of our next projects, I hope to make this beautiful hammered leaf bunting. We don't technically have autumn here, but green leaves are just as pretty as colored leaves. It would be so much fun to make a bunting for inside the house with beautiful leaves found in nature and it's such a simple craft. Check out Morning Sun Rae to find out how to make them.
Recycled Bat and Pumpkin
Halloween is my favorite time of year! I have craft ideas I've been saving up all year long until October rolls around and we can finally pull them out. So far this week, we've made a little recycled vampire bat and a festive pumpkin that will make a great centerpiece for Thanksgiving as well.
For the pumpkin, you can use any size brown paper bag. We used craft paper that was used to pack some items that arrived in the mail. I balled up some of the craft paper and wrapped a square piece around it which I tied tightly at the top with a piece of yarn. I let my daughter paint the pumpkin and once it was dry, we used a brown chenille stem for the vines and some green construction paper for pumpkin leaves. I just pushed the tip of the chenille stems through the base of the leaves before curling the ends with a pencil.
The bat is made from a toilet paper tube. Fold the top of the tube in half to create a crease on each side, then fold the two top sides down into each other to make ear shapes. Paint the entire bat black. Once dry, you can glue on googly eyes or paper eyes or you can paint them on. We used red glitter and glue to make sparkly, spooky eyes. Little scraps of white paper glue on for the teeth. The wings are just hands traced on construction paper and cut out. You could also make some super cute owls the same way using brown construction paper and leaving the toilet paper tube unpainted.
Recycled Inch Worm Catarpillar
Here's a simple, cute, recycled craft I made with my three year old using one old paper towel tube. You could also use a couple of toilet paper tubes. Cut the sections out and secure them together at the bottom using staples. I let my daughter paint the whole thing green (she loves getting to do the painting part of crafts) and then we glued on a face and stuck chenille stem antennae through his head once he was all dry. It's surprisingly sturdy and my daughter loves carrying it around the house and playing with it.
Sep 29, 2011
Jellyfish in a Bottle
If this little homemade jellyfish in a bottle isn't just THE coolest thing ever, I don't know what is. Thanks so much to Bhoomplay's Blog for sharing this fantastic idea!
Sep 24, 2011
Homemade Terrariums
I love these little homemade terrariums from Analog Me SO much! Check out the cute little animals used in some. For complete directions, head over to the blog and see how to make them. It's so easy!
Aug 23, 2011
Homemade Marbles
Last Friday, our homeschool group made these fun homemade marbles using Sculpey clay. You can use Fimo or any other brand, just be sure to use the heavier clay, not the lightweight foam type. The clay is soft enough to be worked by little hands and it takes only a couple of minutes to make each marble. We tried different designs and mixed colors as you can see. Once finished, just smooth them as best you can with your fingers and bake them in the oven for fifteen minutes until hard. Our marbles are a modern version of old Civil War era marbles kids used to make from clay.
Aug 22, 2011
Sparkly Dragonflies from Nature
These sparkling dragonflies from Twig and Toadstool are the perfect nature activity. You don't need much to make these beautiful toys. I love the idea of making a mobile with them. I also love the idea one reader had about using mussel shells from the beach instead of maple seeds. Here in Hawaii, we have the shells, but not the seed pods.
Treasure Stones
These treasure stones found over at Sew Can Do are just TOO COOL! What a great gift activity. They would make excellent party favors for a dinosaur-themed party and the kids can help make them.
Aug 20, 2011
Easy Felt Shapes
Here are some really nice play shapes you can easily make at home from felt. These shape sets can be used for all kinds of games and math activities for younger and older kids alike. Head over to Origami Mommy for a tutorial on how to make them.
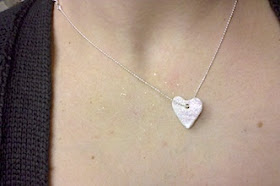
Clay Heart Necklaces
These beautiful and inexpensive heart necklaces are made from clay and would make great gifts for grandmothers or moms for any special occasion. We'll save this idea for Christmas this year. Check out Muffin Tin Mom for tips on how to make them.
Painted Doily Garland
This is such a pretty craft and great for kids of all ages! Check out Whatever to find out how you can make them with your kids.
Aug 18, 2011
How to Make Your Own Hourglass
I love this activity from Paris Bourke. All you need are a couple of bottles or jars, some twine, glue, sand or salt and you're set. What a great way to teach kids about passing time. You could also use it if you do time outs and need a timer or if you time things like hand washing. They are also pretty enough to set out as decorations, maybe in a nautical themed bathroom.
Homemade Ice Cream in a Baggie
We don't have money or space for an ice cream maker. That's why I think this ice cream in a baggie idea is fabulous. Head over to 2 Little Hooligans to learn how to make it.
Aug 16, 2011
Easy Paper Pinata
If you're looking for an easy pinata craft for parties, try this simple one with the kids by Scattered Thoughts of a Crafty Mom. All you need are treats, a paper bag, some ribbon, staples, hole punch, glue and some crepe paper.
Stone Dolls
I just adore these stone matryoshka dolls by maya*made! How pretty! I'd love to have a few around the house, just for decoration. I think my daughter would also enjoy playing with them, maybe even tucking them into little beds. So simple: all you need is a rock and a white paint pen.
Jun 6, 2011
Hawaii Volcanologist Lecture at Hilo Library
On Friday, our homeschool group took the kids to enjoy a neat lecture by our local volcanologists. We started out with some reading to the kids and looking at books while they did their setup.
The lecture included a slideshow as well as some very neat videos. You can see some of the awesome footage of our volcanoes erupting at the USGS Hawaiian Volcano Observatory website.
The best part was when the speakers brought some kids up to try on the various articles of protective clothing used when studying the volcanoes and collecting lava samples. The kids also got a good first-hand look at all of the equipment used by the volcanologists.
In all, it was a really neat experience for the kids, especially seeing the clothing and getting to dress up. For more information about volcanoes and Hawaii Volcanoes National Park, visit the USGS website for more. There is also information on current earthquakes caused by the volcanic activity.
More volcano info:
Hawaii Center for Volcanology
An Awesome Interactive Volcano Explorer
Volcano Links and Lesson Ideas
Animal Footprints Memory Game
I made this awesome wooden memory game for my daughter in about two hours. You can, too! You'll need thirty 1.5 inch wooden disks or squares and a black non-bleeding pen. I used a Sharpie pen - not a sharpie marker, but the pen in fine point. It looks like this. You will also need a pencil and a large eraser.
The wooden disks I purchased for a great price from My Heartfelt Designs on Etsy. You can grab 30 of them for $4.45 plus shipping.
First, choose the animal footprints that you would like to use. I used the following: human, bear, opossum, raccoon, cat, dog, deer, elk, pig, porcupine, beaver, bird, duck, rabbit and horse. For younger kids, be sure to avoid footprints that look too much alike or there may be some confusion during the game. I found pictures of most of the animal tracks at Bear-Tracker.
Carefully draw the outline for each footprint using a pencil. Work lightly or you will have a hard time erasing your mistakes. Place each footprint slightly above center so you will have room to write the name below. Be sure to add the name in pencil as well.
Once you have your matching footprints all drawn, use your pen to carefully trace over the pencil. Once your drawings are completed, carefully erase your pencil lines. Then use your pen to shade in the footprint shapes.
This game is great for kids of all ages. My three year old loves it and learned the names of all of the animal tracks after playing it only twice. It's a bit of work, but it's worth it and you can do it. Have fun!
May 19, 2011
Chalk Drawing
This is our first chalk drawing inspired by Waldorf artwork, specifically the beautiful work that we see on this blog.
Apr 22, 2011
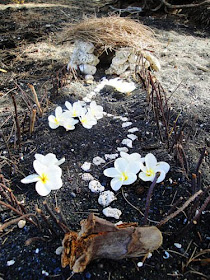
Fairy Cottage
We spent the day at the beach today making this sweet little beachy fairy cottage. I built the cottage itself from pieces of coral. The thatch is ironwood needles which are like pine needles which are built over a lattice of sticks. We used more coral for the stepping stones, sticks for the picket fence and gathered plumeria flowers from the ground to plant a garden. A seed from a pandanus tree made a cute little gnome with spiky hair. This toy is a three-year-old's dream.
Check out these links to other fairy house web pages:
How to Build Fairy Houses
Disney Family Fun Fairy Houses
Bluebird Baby
Gypsy Magic
Apr 14, 2011
Free Word Search Maker
Check out this free word search maker by Lakeshore. Just input your words and it will create printable word search and key pages.
Apr 5, 2011
Faux Butterfly Collection
I am floored by this faux butterfly collection by Paper View. I like the idea of changing her craft up a bit and using it as an educational tool. Just go online and download some butterfly clipart. Then print it out on a color printer and cut out the butterflies. (The most precise way is to use an Xacto knife, so parents may need to do this part.)
Print out the butterfly names separately and have the kids look the butterflies up in a field identification guide. After matching the butterflies with their name, they can glue them to a board or frame with the appropriate name underneath. These would make a great educational project that is also decorative.
Mar 28, 2011
Dover Coloring Books
I just can't say enough good things about Dover Publishing. Their products are very affordable, the highest quality and they are made in the USA. I highly recommend them. They have a very extensive line of educational products that range from coloring and activity books to paper dolls, stickers and removable tattoos.
My current favorite is their Audubon Birds coloring book. The price is only $3.95 for a full-sized coloring book. Plus, if you order from Amazon, they are eligible for free Super Saver shipping. We aren't talking about cheap brown newsprint pages, either. Each coloring book features heavyweight white paper with good grain and clear, dark black print.
We purchased the Audubon Birds coloring book mostly for the beautiful images, but it also contains informational text under each image that describes the species of bird. There is also a guide inside the cover of the coloring book that shows all of the original paintings in full color so that you can use the true colors if you like. These are excellent for both older and younger children ranging in age from about two to adult. Even I can't seem to keep my hands off of them!
Tide Pools
This series is from a trip our homeschool group took to some local tidepools. The kids took a bucket and some fish nets and used them to collect any type of sea life they could find.
There were sea urchins, sea cucumbers, hermit crabs, a worm and a coneshell. The coneshell was an excellent lesson in beach safety as they are venemous and can be deadly. The children learned how to identify and recognize several marine species using identification guides.
The kids also had a lot of fun handling the non-venemous animals. Sea cucumbers are slimy and will expel their guts when threatened. Unfortunately for the poor sea slug (who was not harmed) the kids got a first-hand look at how this happens and why.
A couple of the older boys made drawings of the animals that we found and wrote down key information about identifying them as well as their habitat and lifestyle. Printout sheets are a great way for the kids to keep records of what they learn.
Of course, once the lesson was finished, the animals were returned to the tidepools where they were found.
A Lesson in Civil Disobedience
I love this article that my sister-in-law shared with me entitled Father: Why I Didn't Let My Son Take Standardized Tests.
The writer discusses his experiences with taking his son out of school and embarking on a test of self-teaching and real-life lessons.
Jan 25, 2011
62 Ways to Decorate Eggs
If you are looking for some more beautiful and unique ways to decorate Easter eggs this year, forget the PAAS kits and try some of these amazing egg decorating techniques at Martha Stewart's Everything Easter. Oh my gosh! This website has me crying for joy! Egg decorating is one of my most favorite things in life.
What Kind of Glue Do You Need?
Do yo want to stick something to something else but aren't sure what kind of glue you need? Plug your items into This to That and it will tell you! This is a super easy way to find the right glue for all of your crafts and projects. Today my daughter's metal clip fell off of her felt mushroom hair accessory. Fixed!
Jan 22, 2011
Free Printable: "Ten Things I Love About You"
Looking for some great Valentines day activities to do with your kids? Check out these cute free "Ten Things I Love About You" printables by Crafty Carnival. The artwork is adorable and if you have a child who can't yet write, you can make it a collaborative effort where you fill in the blanks and they can color.
Flubber Recipe
We had so much fun today making this awesome slime recipe. The ingredients are mostly non-toxic, but be sure not to get any in your eyes and don't let the kids eat it. It is easy to clean up, just keep it off of cloth as it likes to soak into fabric.
Flubber will mold but you can prolong its life indefinitely if you keep it in the refrigerator.
Ingredients:
- 4 oz white school glue
- 1 tsp borax
- water
- food coloring (optional)
1. Pour the entire bottle of glue into a cup or jar.
2. Fill the glue bottle with water and pour into the jar with the glue. Mix well. Add food coloring if you want to; otherwise, your slime will be white.
3. In a separate bowl, mix 1 cup water with 1 teaspoon borax.
4. Slowly stir the glue mixture into the borax mixture.
5. The slime will thicken in the middle. Once it thickens up a little, remove the slime from the bowl of water. Knead and roll the slime in your hands until it feels dry.
6. Have fun! Flubber slime will wash up with plain water.
Want a different recipe? Try these great slime recipes!